To Be Clandestine or Not
Banners and flags are a visual representation of our Party. Our Party is legal in this country at this time. There have been times where there were attempts to make the Party illegal and we prepared to operate underground. This is the reality of some parties in other countries. The struggle to be out and to be openly proclaiming who we are, whether as the CPA , as unions, or as any other mass organisation, continues against different kinds of opposition.
These include the bourgeois mass media most of which strive at all times to show the unorganised as the normal, silent majority that they speak for. At the same time, they represent the organised people – those with collective agency – as not having agency, or otherwise just ignore the Movement and do not report its actions at all.
This conflict is at the heart of the question of Agitprop. It is the reason why Agitprop is constantly necessary. The organised masses face a constant counter Agitprop, which is better funded and, in some media, but not in all, more extensive than our own.
Then there is the extent to which the movement mistakenly removes itself from the public realm. This happens when we say that the movement’s business must not be done in public. But in fact the movement’s business is supposed to be done in public. What we have to guard against is not exposure, but manipulation by selective exposure combined with selective concealment, distortion and lies. The best defence against all of these is openness.
Branch Banner and Flags
Usually branches get their banners made for them, and pay.
The banner is likely to be any branch’s first big purchase. It needs to be looked after carefully and kept ready for use.
Supplies
Banners and flags can be professionally made at places like Vista Print and Office Works. But if you want to make your own here are some ways to do it.
• Paint (water-based acrylic,
latex house paint, or spray
paint are best. Do NOT use
enamel or oil-based paints.)
• Brushes (cheap foam brushes
work best.)
• Computer and digital projector
(optional)
• Grommets
• Scissors
• Needles and thread
or sewing machine
• Flat nylon webbing
• Thin nylon cord
• PVC or wood poles (optional)
• Permanent markers and
pencils
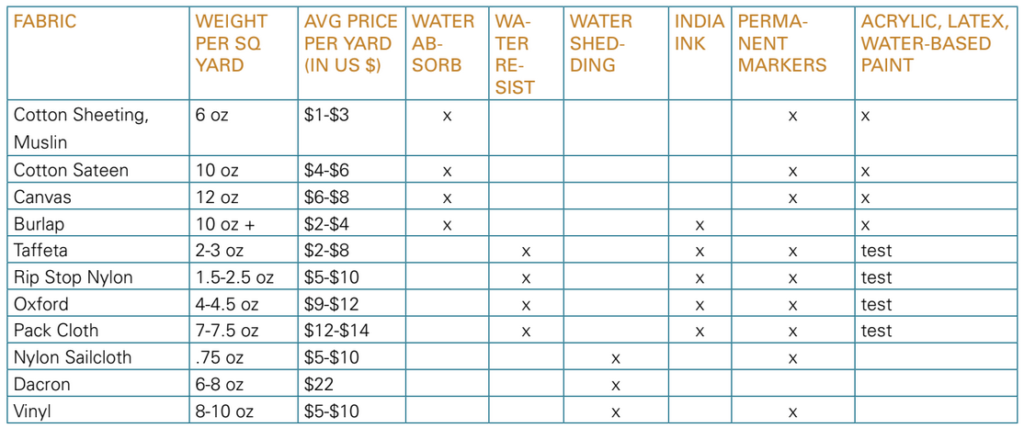
• Fabric (see chart below)
Planning
Consider the following:
Location: Where and how will the banner be used? What are the environmental conditions (highwinds, wet weather, etc)?
Size and Scale: How large does the banner need to be to be visible, legible, and have an impact at the location where it will be used? A 30ft banner could look tiny if the scale of the background is large enough. Scout the location before making the banner!
Message: Keep it short and sweet. Test it out on a lot of people before you commit. Make sure it makes sense to your target audience and to the general public, and not just insiders.
Time: Making banners takes longer than you think! Plan time for buying materials, construction, painting, drying paint, attaching hardware and rigging the anchoring system.
Budget: Is there enough money for the labour and materials involved? The budget may end up deter mining the size and location of the banner.
Making Banners & Flags Handheld and Processional Banners
Choose Fabric:
a. Use canvas or natural cotton fiber fabric that is receptive to water-based paints and painting over (re-use). Preshrink to avoid puckering with water-based paints.
b. Nylon fabrics such as ripstop or oxford are typically lighter in weight than canvas and are available with water resistant coating. They can be less receptive to water-based paint, so test the paint on a small swatch of the fabric.
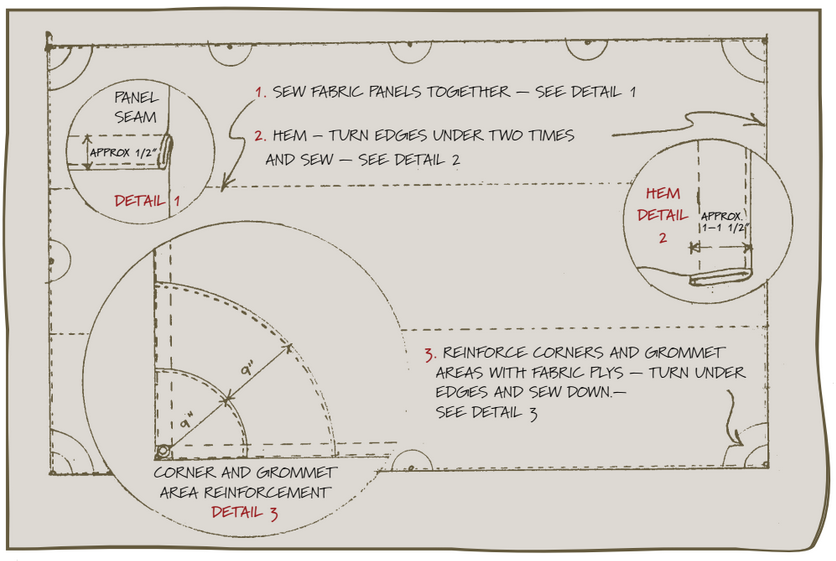
2. Sew Banner: See illustrations below.
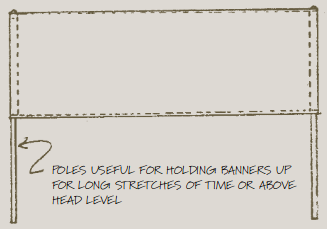
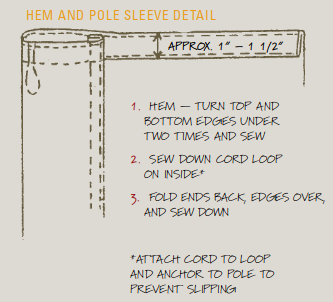
3. Reinforce Hems: For lightweight fabrics, sew webbing along the top hem or run rope through the top hem casing for extra strength. Duct tape can also be used to hem edges. Reinforce any grommets with webbing or extra layers of fabric.
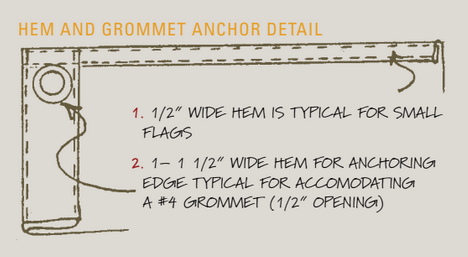
4. Build Anchoring System: Run poles through the pole sleeves or pockets (sew top of sleeve shut). Set grommets in the corners, attach cords and tie onto poles or use as handheld straps.
5. Add Extras: If standing still, it can be helpful to tie cords to the top of the pole to pull outward to create tension to prevent sagging in the middle of the banner. If marching, a few well-placed u-shaped slits in the banner can help reduce wind resistance. Wear a tool-belt and set the pole into one of the pockets for easier carrying.
Handheld and Suspended Flags
1. Choose Fabric: (See above). Lightweight fabrics will fly easier than heavy ones. If graphics are to be on both sides, use opaque fabric or consider sandwiching together two layers.
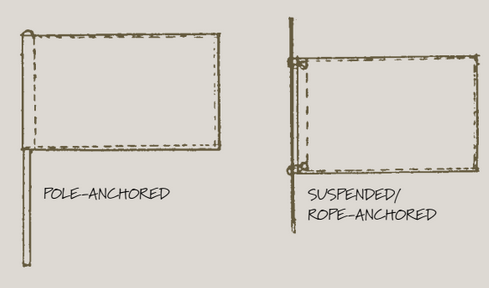
2. Sew Banner: See illustrations below.
3. Reinforce Hems: For lightweight fabric, sew webbing along anchoring edge or in grommet areas for greater durability. Duct tape can also be used to hem edges.
4. Build Anchoring System: For poles, see sleeve detail above. For suspended flags, set grommets at top and bottom along one side only. Attach cord and tie onto the pole or rope.
Suspended Banners
1. Choose Fabric:
a.Use lightweight natural fabrics receptive to water-based paints. Preshrink to avoid puckering with water-based paints.
b.Synthetic fabrics such as ripstop nylon and oxford are lighter in weight and easier to compact (less mass) compared to canvas, and are available with water resistant coating. They can be less receptive to water-based paint, so test the paint on a small swatch of the fabric.
2. Sew Banner: See image below.
3. Reinforce Hems: Sew webbing along top hem or in grommet areas for durability. For large light-weight fabric banners (150 sq ft or larger) that will be subjected to wind or stress at anchor points, sew webbing along all edges for strength and durability.
4. Reinforce Corners and Grommets: For large banners (150 sq
ft or larger) that will be subjected to wind or stress at anchor points, sew extra layers of fabric (see detail) to reinforce. Dacron sailcloth works best for layer closest to grommet.
5. Build AnchoringSystem: Attach grommets in all corners and spaced out along all edges. Spur type grommets, typically used on sails, are stronger than washer type grommets.
Laying Out Graphics
Old School Method:
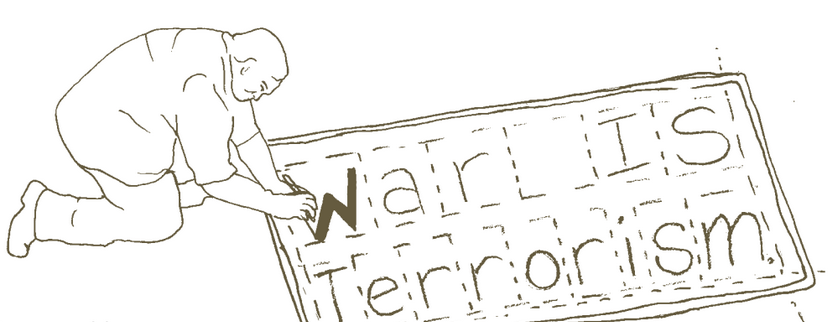
1. Draw your banner image onto paper.
2. Lay the banner out on a table or the floor. Measure the length of space to be covered by the text.
3. Figure out how many units your text requires:
• All lowercase letters, numbers, and spaces between words count as 1 unit except m & w (1 1⁄2 units) and f, i, j, l, and t (1/2 unit).
• All capital letters count as 1 unit except M & W (1 1⁄2 units) and I (1/2 unit).
4. Divide the total length into the number of units needed.
5.Freehand sketch the letters onto the banner using a pencil or marker. Freehand the graphics in the space remaining, or use the grid method to transfer. (Draw a grid over your image on the paper, make a larger matching grid on the fabric, and transfer box by box.)
6. Fill in letters and graphics with spray paint or use brushes and water-based paint.
High Tech Method:
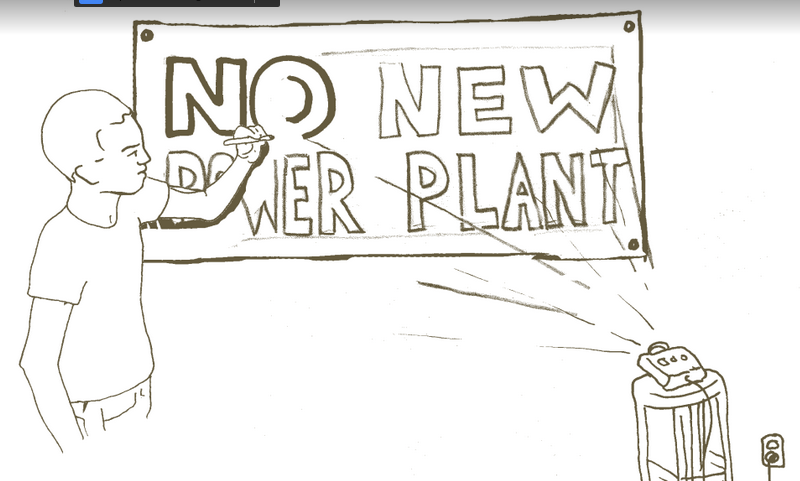
1. Create the graphic or text on a computer-based graphics program. Make sure your dimensions match the dimension of the final banner.
2. Hang banner on a wall. Project the graphic onto the blank banner using a digital projector.
3. Trace the graphics and text with permanent markers. It can be helpful to mark the color of each shaded area onto the banner as you trace.
4. If using spray paint, leave the banner on the wall and fill in the graphics with spray paint. If using water-based paint, spread the banner on the floor before painting.
Credits
Wolston, Kim and Amelia Slayton. Banner Making Manual. The Ruckus Society. 1997.
Stone, Lynn. “Bedsheet Banners 101”. 2006. The Ruckus Society. 5/2/2007. http://www.ruckus.org/article php?id=250.